INSTALLATION TIPS & INSTRUCTIONS
STEP 1:
Level the original stall floor. You may have to fill in holes with some base material. If it is a new floor, be sure to wet and compact it well before starting your installation.
STEP 2:
You will be leaving 4 to 6 inches for the installation of the floor.
Add 2 inches of the new base material, wetting and compacting firmly.
Repeat this process of laying 2 inches of base material, wetting and compacting until the acquired depth is obtained.
STEP 3:
The next 2 inches of base. Leave this loose and un-compacted to receive the floor.
Use a straight edge, (example a 2 x 4 board) to work the last 2 inches back and forth until the base is level.
STEP 4:
Do the following to prepare the Groundmaster floor to install:
The floors have been rolled very tight for shipment.
You should roll the floor backwards to un-curl it.
**NOTE: Floors are easier to work with when warm, but do not lay them in the sun without being covered.
STEP 5:
Loosely roll or fold floor back up and carry in into the stall (wrapping a couple of straps around it will make it easier to carry).
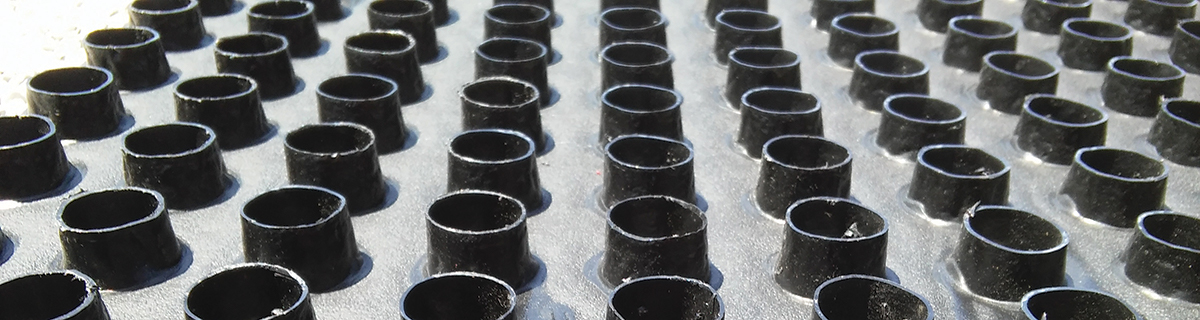
STEP 6:
Lay the floor with the funnels facing down and make any necessary cuts.
Make sure base material is damp.
Start at the back of the stall and secure the floor every two feet along the edge with anchors.
Mechanically compact the floor towards the door, anchoring and compacting as you go.
Be sure to anchor any places that do not want to lay flat; like a seam.
Put anchors one foot apart across any doorway and one on each side of any cuts.
Make sure anchor heads are level with the floor surface.
•If anchors pound in easily in the top 6 inches, then your base needs more compacting.
•Pounding anchors on a slant may help them seat in.
•Sometimes “hand tamping” is needed around the edges.
STEP 7:
All funnels should be filled as full as possible from the bottom by mechanically compacting. Any remaining emptiness of the funnels is filled by adding a Minimum of two inches or more of the base material to the top of the floor.
Wet and compact the top base material until firmly compacted.
STEP 8:
Six to eight inches of bedding is recommended.